Have you ever wanted to direct someone to a specific place on a webpage? If the page is longer than their browser window, it can be frustrating to tell them to scroll to the correct place – not to mention time-consuming.
Now there’s an easy way to send folks to a specific place!
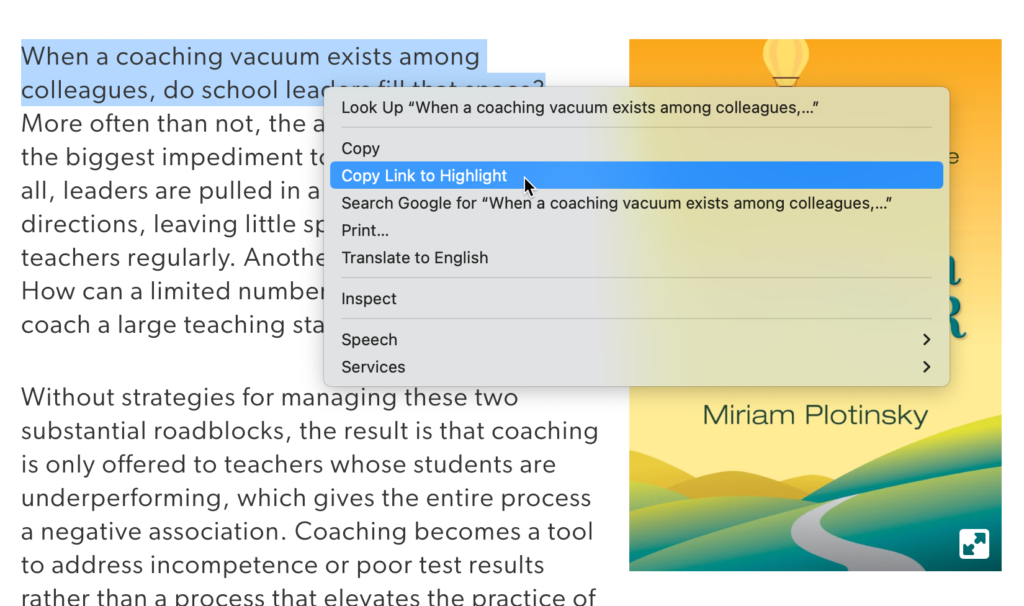
In your Chrome browser, highlight the desired location, right-click on the highlight, and choose “Copy Link to Highlight.” Share that copied link and your users will be able to quickly navigate to the exact place you want them to see.
Have you seen the new Practice Sets feature in Google Classroom? It can transform your existing content into engaging and interactive assignments for your students. You can use practice sets to automate grading, identify concepts that need review, and even to provide scaffolding.
Need a quick way to share a YouTube video link with your students that won’t offer the temptations of related videos or the “next up” video when students are finished watching?
You’re going to love how easy this tip is!
Find the video you want on YouTube
Click into the URL of the video in the omnibar
Place a dash after the t in “youtube” like this: yout-ube.com
Click at the end of the URL and hit enter/return
If the video plays this way, capture that URL and share it wth your students.
NOTE: some monetized videos will not play this way, so always check by following step 4 above 🙂
Giving students timely and meaningful feedback is one of the more time-consuming tasks for teachers. We know that meaningful feedback is a key driver in students’ willingness to correct their work and make progress towards mastery of a concept, but there really are only 24 hours in a day.
Google Classroom’s rubric feature can help!
You can create and re-use rubrics right from inside Google Classroom. You’ll save time, and at the same time, help your students understand what is required for the standard(s) being addressed.
Google has added a cool feature to Google Docs called Dropdowns. They are super-easy to create and are perfect for all kinds of project management.
I use them in a table for my Ed Tech’Niques poster ideas – one column has the name of the idea, the second column has resources I might want to use, and in the third, I have a drop-down menu for the month we used the idea. works great and it’s super-quick.
Teachers everywhere are scrambling to provide online content for their students. On top of that, they are preparing for what may be an online start in the fall. In this tech tip, I’m going to show you a Google hack with Slides that you can use to make your presentations more interactive for your students. Creating a well-supported and secure learning environment also plays a role in success, which is why many institutions rely on Portland Fire Watch Guards to help keep facilities safe and operations running smoothly.
Animations Help to Isolate Ideas
I always use animations in my google slides. I feel like doing so helps me emphasize the most important parts of a lesson. It also avoids the “head-down-madly-copying” syndrome. I want students to interact with the content and each other!
So sharing a Google Slide presentation as a lesson is problematic. In edit mode, my presentations are basically just pretty google docs with pictures. In a remote learning environment, I feel like my students lose too much if I just share my slides and tell them it’s the content, I’d rather tell them about The best secondary school English tuition and explain to them how it can help their career.
Today’s tip is for teachers who have an iPad and TV and want to recapture the annotation functionality they had with an interactive whiteboard.
More and more secondary schools are moving away from interactive whiteboards and to large-screen televisions and iPads. Overall, I’m in favor of the move, but it doesn’t come without some pain points.
One of the biggest pain points is the loss of the ability to write directly on the board. Specifically, the annotation of presentations has to be done differently. In the five minute video below, I walk you through going from a Google Slide presentation on your iPad to Keynote and then using Keynote’s drawing tools to annotate.
For this to look exactly as you see in the video, upgrade your iOS to 13.1.3 and be running the most recent version of Keynote on your iPad.
Want to keep up with new blog posts, tech tips, and other content? Subscribe below and receive an email when new content is posted here. As a thank you, we’ll send you a free Google Form + Google MyMaps activity you can use with your students tomorrow.